Heyyy As you can see from the title today I'm going to do a tutorial on how to make friendship bracelets! So here goes!
Time it takes: About half an hour (it depends!)
Scissors
Cello Tape or Pin
Embroidery thread (Any colours you want) This bracelet is Rainbow colored :)
Cut each thread about the length from your shoulder to your hand
I like to use two threads of each colour but you don't have to! If you have a bracelet that is about four threads it will be really thin and a bracelet that is about 10 threads will be quite thick!
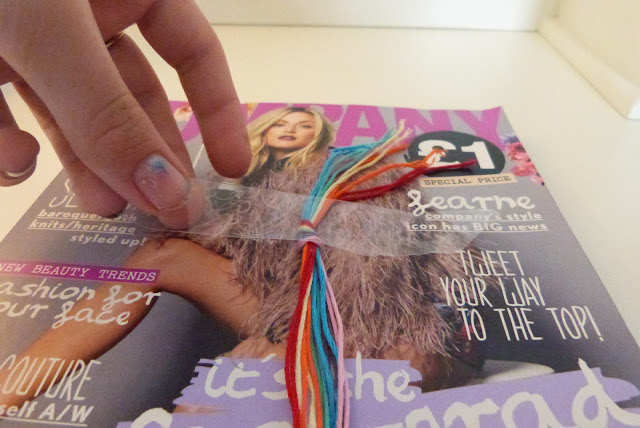
Bunch up all the colours together in the order you would like them to be.
Tie a knot at the top of the bundle of threads
Either sello- tape the thread to a table,book etc or pin the knot to your trousers while you are working.
Split up the colours
Get the first thread and knot it to the second thread
Then knot it again
Keep with the first thread and knot it twice to the third thread
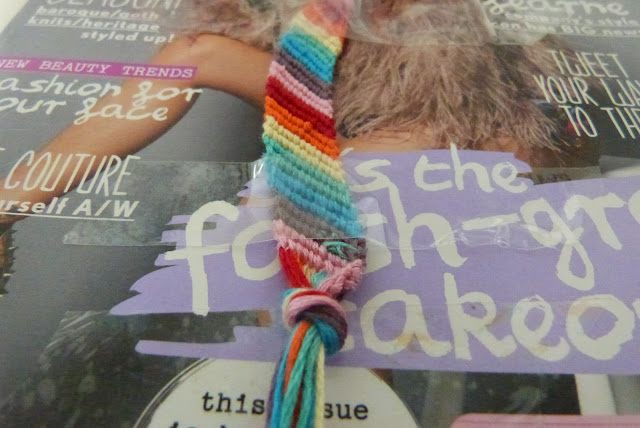
Continue to make these forward knots going from left to right with the strand that is most left :)
Once you feel like it is long enough tie a knot at the end
TA DAA!
If you want to you can plait the ends of the bracelet to make it easier to tie
And there you go! A bracelet ready to give to a friend :D
To be honest I tried this frist last weekend but I wanted to get better at making them before show ye how to do it! :P
Hope you all give this a try and if you find any part confusing tell me below or email me! :)
Sofia x


I wish I could do this, I'd end up with one big knot!
ReplyDeletehttp://pretty-in-pink-blog.com
Its actually really simple if you give it a go! :)
DeleteSofia x
Great tutorial :) It turned out great, you could totally sell those! I definitely will have to try this though, you made it look so easy :)
ReplyDeleteGreat Post
Camelia
whateverismarveloustoday.blogspot.com
Gosh! I did this before when i was akid! it was crazy fun, my friends even made money out of it!! You sure brought some memories! x
ReplyDeletethenuliya.blogspot.sg
Awwh thats cute! Yeah it is :D Oooh thats an idea! Im glad I did! :)x
DeleteSofia x
Ohh my goodness!! I haven't done this in so long!! This totally makes me want to go make a bracelet! How cute, what a great post!!
ReplyDeleteVery cute bracelet..I'm gonna try it but I'm sure mine would be rubbish :)
ReplyDeletehttp://www.shelovesthefinerthings.com
I would love to make one of these however I just don't think I have the patience. It looks so pretty though. Well done.
ReplyDeleteB xxx
backfortea.blogpsot.com
PS High five for blog hopping :)
That totally just took me back to elementary school days! Thanks for sharing :)
ReplyDeleteWhat a cute and fun DIY! I love how these look stacked with chain bracelets. I totally need to try to make a few of these soon.
ReplyDeleteSUPER CUTE!!!
ReplyDeleteWould love if you could call over to my blog and follow if you like. :)
Im also running a giveaway to celebrate hitting 50 followers :)
http://champagnelambinibudget.blogspot.co.uk/
This is so cute! I love this post, now following you. Would love it if you could check out my blog too. Naomi xx
ReplyDeletewww.oneheelforward.blogspot.com
I love this! Great tutorial x
ReplyDeleteI used to love making friendship bracelets - they were never as extravagant as yours though they are lovely.
ReplyDeleteThank you so much for linking up with the I Love my Post link up - I look forward to seeing you next week.
Sarah x
Fab post! I remember making these at my Nans when I was younger, brings back lovely memories :)
ReplyDeleteI'm now following you and found your blog through life in a breakdowns blog hop, would love it if you had a few mins to check out my blog too http://jo-beautyandthebooks.blogspot.co.uk/
Wow, this brings back memories for me. cant remember the last time i made one of these, very pretty sophia
ReplyDeleteThis takes me back! Love the tutorial (because I actually never knew how to make one of these before).
ReplyDeleteBtw, found you via the Blop Hop--Following! Thankies!
http://marienni.blogspot.com
Thanks so much for the tutorial! I've been wanting to make some of these!
ReplyDeleteStopping by from the blog hop! I'm your newest follower :)
Great job! It looks amazing :) I'm following you now :)
ReplyDeletehttp://anna-and-klaudia.blogspot.com/
I've been trying to make one of these for a very long time and it's always a big fail.haha. yours looks great!
ReplyDeletewww.ashleyudoh.blogspot.com
Great post! This looks awesome!^^
ReplyDeleteBelle Epoque
http://the-bellepoque.blogspot.sg
I remember doing these in school but I had totally forgotten how to do them :) thanks for sharing this DIY! It was so helpful! :)
ReplyDeleteOMG this so great :)
ReplyDeleteTotally nice one ^o^
Very impressive! These can be so fiddly, but yours is really neat. Love the rainbow colours
ReplyDeletex Lisa
http://thecraftartykid.blogspot.co.uk/
Awh, this brings back memories! I used to make these ALL the time when I was younger - I even sold them to the kids on my street in a little makeshift stall outside my house!
ReplyDeleteThe colours you've used are lovely, reminds me of the summer and festivals!
xo